Contents
Barcoding
Inventory Pro supports label printing and barcode scanning. Print labels for items, inventory, locations, and assets, then scan them directly into transaction fields.
| Feature | Purpose |
|---|---|
| Configuration | Set up barcode formats and defaults |
| Printing | Generate labels from desktop and mobile |
| Scanning | Capture barcodes during transactions |
| External Barcodes | Link manufacturer and UPC codes to items |
Configuration
Access: System → Configuration → Barcode Configuration
Inventory Pro uses table-driven label definitions that control format, size, and data content. Configure default labels for each type to standardize printing across your organization.
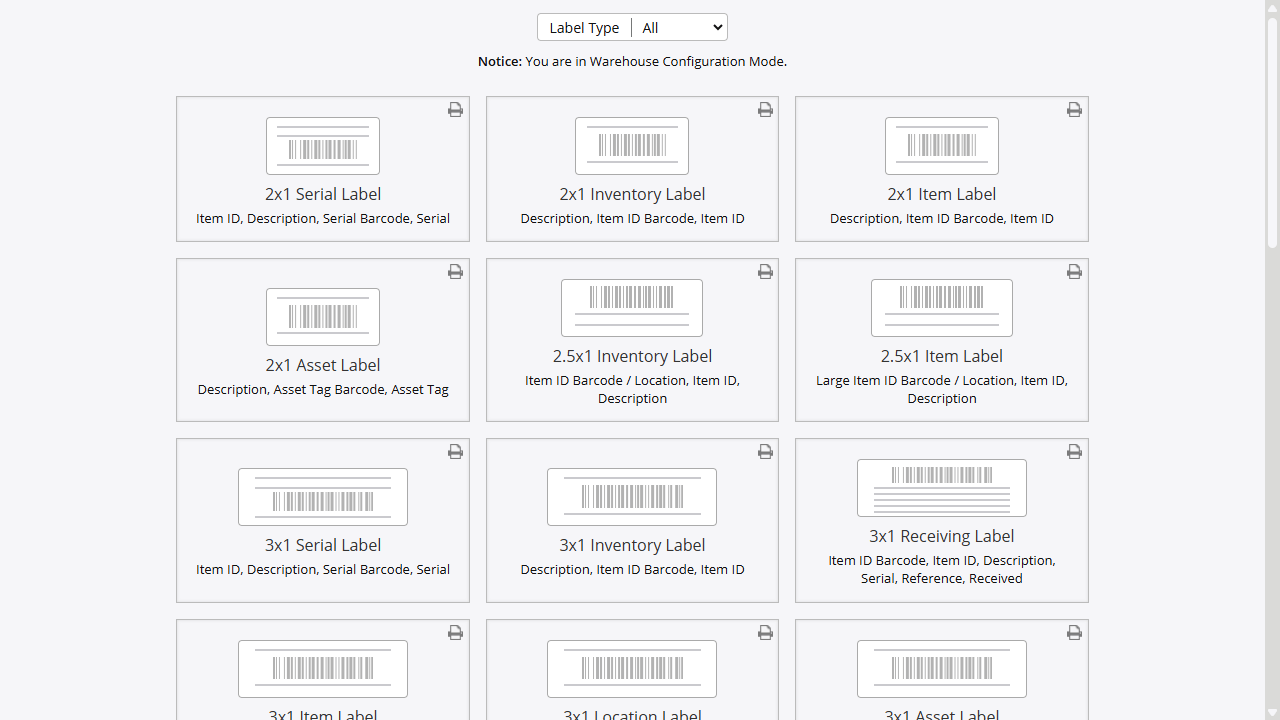
Label Types
| Type | Purpose | Use Case |
|---|---|---|
| Items | Basic 1D barcode with Item ID and description | Getting started with barcoding, item identification |
| Inventory | Detailed labels for specific inventory lots | Tracking individual stock entries with dates and costs |
| Serialized Inventory | Serial number as primary identifier | Serialized items requiring unique tracking |
| Receiving | Inventory labels with receiving details | Expiration dates, pallet references, supplier info |
| Assets | Asset tag barcodes | Equipment and fixed asset identification |
| Locations | Bin and shelf labels | Warehouse location identification |
Supported Barcode Formats
1D Formats (Linear):
| Format | Description | Best For |
|---|---|---|
| Code 128 | Standard format for Inventory Pro | Most non-retail applications (default) |
| Code 39 | Legacy format with limited characters | Older scanner compatibility (read-only) |
| UPC | Universal Product Code | Retail product identification |
| EAN-13 | International variant of UPC | International retail |
2D Formats (Matrix):
| Format | Description | Best For |
|---|---|---|
| QR Code | Square matrix code | High data density, mobile scanning |
| PDF417 | Stacked linear with error correction | Vehicle registrations, shipping |
Label Size Configuration
Labels are defined with specific dimensions. Common sizes include:
| Size | Typical Use |
|---|---|
| 2” × 1” | Small item labels |
| 2.5” × 1” | Standard inventory labels |
| 3” × 1” | Extended item labels |
| 3” × 2” | Detailed receiving labels |
| 4” × 6” | Shipping labels |
Admin Options for Barcoding
These admin options control default label formats by type:
| Option | Purpose |
|---|---|
| 63 | Default Serial label format |
| 64 | Default Inventory label format |
| 65 | Default Item label format |
| 66 | Default Location label format |
| 67 | Default Asset label format |
| 68 | Default Receiving label format |
| 315-318 | Mobile barcode format strings |
Setting Default Labels
- Navigate to System → Configuration → Barcode Configuration
- For each label type, select the default format
- Optionally configure warehouse-specific defaults
- Click Save
The system resolves label defaults in this order:
- Warehouse-specific default (if configured)
- Custom label selection (if specified)
- Admin option default for the label type
Printing
Desktop Printing
Desktop label printing creates PDF documents that can be printed to any printer, including dedicated label printers.
Item Barcode Utility
Access: Inventory → Stock → Item Barcode Utility (or popup from item screens)
Print labels for individual items with quantity control:
- Search for the item
- Select the label format (or use default)
- Enter quantity of labels to print
- Optionally specify location
- Click Print
Inventory Barcode Catalog
Access: Inventory → Stock → Barcode Catalog
Print labels in bulk for inventory records:
- Filter inventory by item, location, or warehouse
- Select items to label
- Choose Catalog (summary) or Individual labels
- Select format and click Print
Location Labels
Access: Inventory → Warehouses → Location Labels
Print labels for warehouse locations:
- Select the warehouse
- Filter or select locations
- Click Print to generate location labels
Receiving Labels
During receiving, optionally print labels for received items:
- Complete the receiving transaction
- Check Print Labels option
- System prints labels using the Receiving label format
Order and Shipping Labels
Print labels for shipping orders and work orders:
- Shipping Labels: Orders → Shipping Orders → [Select Order] → Print Label
- Work Order Labels: Work Orders → [Select WO] → Print Label
Mobile Printing
Mobile devices generate PDF labels displayed in the browser for printing.
Access: Inventory Pro Mobile → Menu → Print Labels
- Navigate to the barcode/label screen
- Select the label type and item
- The system generates a PDF in the browser
- Use the browser print function to send to a printer
Note: Mobile label printing produces PDF output. For direct thermal printer integration (Zebra, etc.), print from the desktop application or configure network print services.
Automation
For automated label printing during receiving or other operations:
- Enable print-on-receive in the receiving screen options
- Configure default label formats in Admin Options
- Labels generate automatically after transaction completion
Scanning
Desktop Scanning
Desktop barcode scanning uses keyboard wedge mode-scanners emulate keyboard input, typing the barcode value into the focused field.
Setup:
- Connect a USB or Bluetooth barcode scanner
- Configure the scanner for keyboard wedge mode (usually default)
- Position cursor in the target field
- Scan the barcode-data enters as typed text
Compatible Fields:
- Item ID fields (lookups)
- Serial number fields
- Location fields
- Search fields
Mobile Scanning
Mobile devices support multiple scanning methods for flexibility in different environments.
Built-In Camera Scanning
Use the device camera to scan barcodes:
- Navigate to a scan-enabled screen
- Tap the camera/scan icon
- Point camera at the barcode
- The code is captured and entered into the field
Supported Formats: Code 128, UPC (configurable via BarcodeReaders setting)
Bluetooth / USB Scanners
Connect external scanners to mobile devices:
- Pair Bluetooth scanner with the mobile device
- Configure scanner for keyboard wedge mode
- Scan into focused fields
Advantages:
- Faster scanning for high-volume operations
- Better range and durability than camera scanning
- Works in low-light conditions
Image Scanning
The mobile app uses the Quagga library for camera-based barcode detection:
- Detected codes automatically populate the focused input field
- Supports continuous scanning mode for rapid entry
Scan Field Behavior
When scanning on mobile, the system matches barcodes against:
- Part ID (Item ID)
- Serial number
- Secondary serial number
- RFID tag
- Item Alias (PartsAlias lookup)
Matched items automatically load for transaction processing.
Using External Barcodes
Link manufacturer barcodes, UPCs, and other external identifiers to Inventory Pro items using the Item Alias feature.
Item Aliases
Access: Inventory → Stock → Item Alias
Item aliases map external identifiers to your internal item IDs. When scanned, the alias resolves to the correct item.
Common Alias Uses:
- Manufacturer part numbers
- Supplier part numbers
- UPC/EAN codes
- Legacy item numbers
- Customer part numbers
Creating an Item Alias
- Navigate to Inventory → Stock → Item Alias
- Click Add New Alias
- Enter:
- Alias ID: The external barcode/identifier
- Item ID: The internal Inventory Pro item
- Click Save
How Alias Resolution Works
- User scans an external barcode
- System checks against Item ID first
- If no match, system searches Item Alias table
- Matched alias resolves to the internal item
- Transaction proceeds with the linked item
Manufacturer Fields
Items also support direct manufacturer identification:
- Manufacturer/Model: Store manufacturer and model info
- EPN (External Part Number): Alternative part number field
These fields display on reports and can be searched but don’t function as scannable aliases.
Best Practices
Label Printing
- Standardize Formats: Use consistent label sizes across operations
- Test Before Production: Print test labels to verify scanner readability
- Quality Check: Ensure barcodes are clear and undamaged
- Printer Maintenance: Clean thermal print heads regularly
Scanner Configuration
- Scanner Configuration: Test scanner settings with your barcode formats
- Field Focus: Ensure correct field is focused before scanning
- Lighting: Provide adequate lighting for camera scanning
- Backup Method: Train users on manual entry for scanner failures
Aliases
- Document Aliases: Maintain records of all configured aliases
- Unique Values: Ensure alias values are unique across all items
- Regular Audit: Periodically review aliases for accuracy
Related Topics
- Item Alias - Managing external identifiers
- Receiving Stock - Print labels during receiving
- Location Barcodes - Warehouse location labels
- Mobile Inventory - Mobile scanning operations
On this page