Contents
Receive Stock
Receiving inventory is a positive adjustment that increases your on-hand quantities. Inventory Pro supports multiple workflows for different receiving scenarios:
| Receiving Method | Access Path | Purpose |
|---|---|---|
| Direct Adjustments | Inventory → Stock → Receive Stock (this page) | Manual receipts for found inventory, small corrections, or items without formal documentation |
| Purchase Orders | Orders → Purchasing → Purchase Orders → Receive | Standard purchasing flow with approvals, lead time tracking, job assignment, supplier pricing, and status management |
| Appointments | Inventory → Management → Appointments → Receive | Expected receipts without formal POs-ideal for 3PL, warehousing, consignment, or recurring deliveries |
| Cycle Counting | Inventory → Inventory → Cycle Counts | Systematic physical inventory verification with variance analysis and approval workflows |
| Shipping Order Returns | Orders → Shipping → Shipping Orders → [Select SO] → Returns | Customer returns with credit handling and return authorization tracking |
| Work Order Returns | Orders → Other → Work Orders → [Select WO] → Returns | Unused material returns with cost reconciliation and job tracking |
| Mobile Receiving | Inventory Pro Mobile → Orders → View Purchase Orders/Appointments | Mobile device receiving with barcode scanning and real-time updates |
| Bulk Import | Utilities → General → Import and Export | Large data sets from CSV/Excel for warehouse setup or bulk operations |
| Reporting | Reports → Receiving Stock | Analyze receiving history, patterns, and audit trails by date, user, item, or reason code |
All receipts are tracked in the audit trail and material logs with full transaction details for accountability and reporting.
Access: Inventory → Stock → Receive Stock
Understanding the Receive Screen
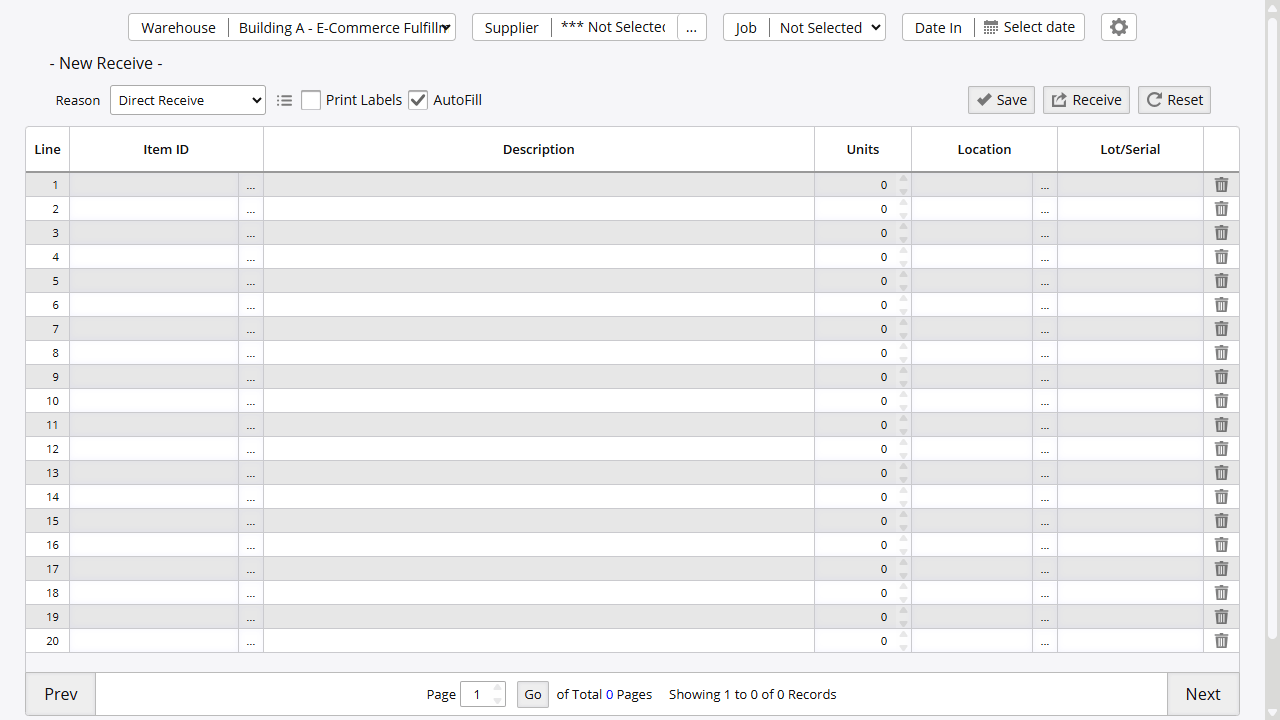
The receive screen uses a temporary staging area where you can add items, make corrections, and review before finalizing. This two-step process (Save → Receive) prevents accidental inventory changes.
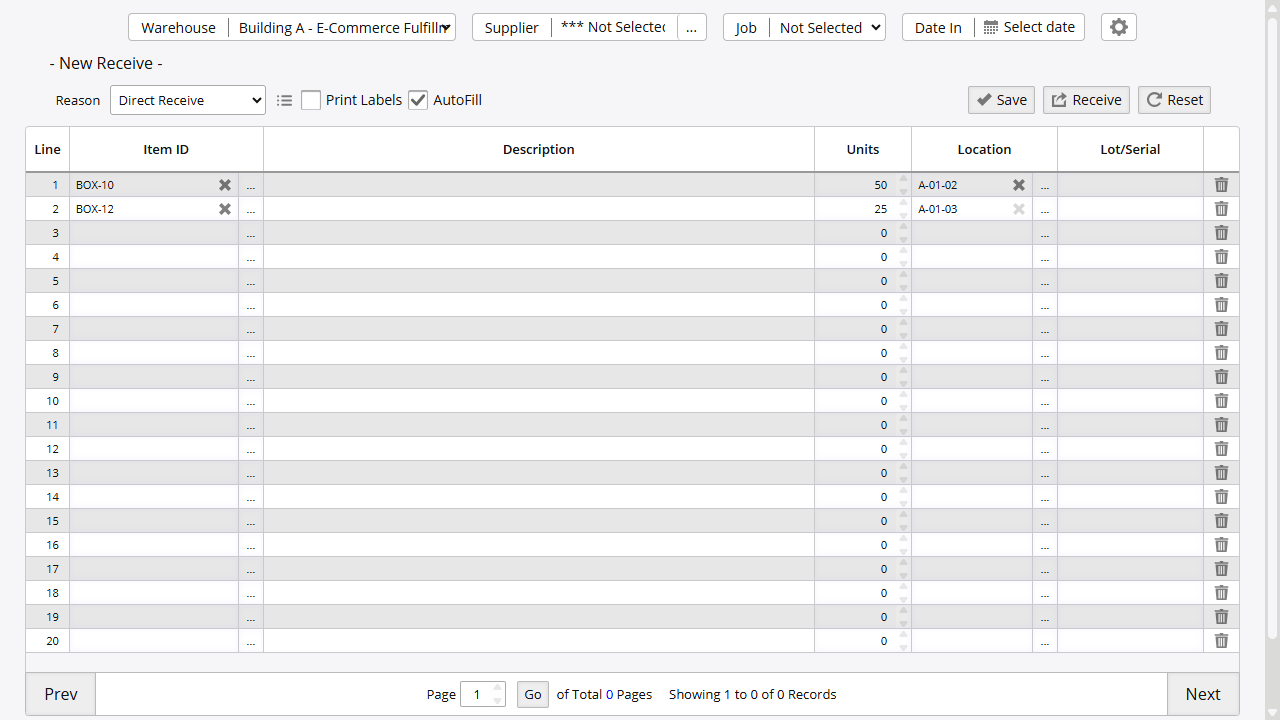
As you add items, the grid fills in with item details, quantities, and locations:
Screen Components:
- Warehouse: Select the destination warehouse (required)
- Reason: Choose the adjustment code explaining why inventory is increasing (e.g., Direct Receive, Physical Inventory, PO Receive). Adjustment codes are managed via the icon next to this field.
- Supplier (optional): Link the receipt to a supplier record
- Job (optional): Assign the receipt to a job
Key Operations:
- Save: Stores items in temporary staging area without updating inventory. Allows review, modifications, and building up receipts over time. Items remain until finalized or reset
- Receive: Finalizes transactions, immediately updates warehouse inventory, and creates permanent audit trail. Cannot be undone
- Reset: Clears all temporary items and starts fresh
- Trashcan Icon: Marks a line to be removed when you save
Receiving Methods
Direct Receiving (Manual Adjustments)
Direct receiving creates positive inventory adjustments without linking to orders-used for physical inventory corrections, found items, or transfers from external systems.
Required: Valid reason code explaining why inventory is increasing
When to Use Direct Receiving:
- Small adjustments (1-20 items)
- One-off corrections found during daily operations
- Found inventory or location discrepancies
- Items received without formal documentation
When NOT to Use Direct Receiving:
- Large-scale physical inventory corrections (use Cycle Counting instead)
- Systematic inventory accuracy programs (use Cycle Counting for variance tracking and approval workflows)
- Supplier returns (use Purchase Orders → “Return” for tracking)
- Customer returns (use Orders → “Return” for tracking)
Workflow:
- Select warehouse
- Choose a Reason (e.g., “Direct Receive”, “Physical Inventory”, “Supplier Shipment”)
- Add line items manually:
- Enter or search for Item ID
- Specify quantity
- Provide location (or use item default)
- Add serial/lot numbers if required
- Enter cost and other optional details
- Save to stage multiple items
- Receive when ready to update inventory
Tips:
- Use AutoFill option to copy the previous line’s location for faster entry
- The system auto-generates a reference number for tracking, or specify your own
- Document the reason in the Remark field for future reference
- For recurring correction patterns, investigate root causes rather than repeatedly adjusting
Line Item Fields
Understanding field behavior helps ensure accurate receipt processing:
| Field | Behavior | Notes |
|---|---|---|
| Item ID | Required | Must be active (not discontinued) and enabled for the receiving warehouse (unless Admin Option 504 is disabled) |
| Units | Required, >0 | Quantity being received |
| Location | Required | Physical bin or warehouse location. Defaults from item’s record if not specified. Must exist in warehouse location master |
| Serial/Lot | Required for serialized items | System validates uniqueness based on serialization settings (unique per system, per item, or per location). Auto-generates when Admin Option 271 is enabled |
| Unit Cost | Defaults from multiple sources - not visible in default grid view | PO line items (for PO receipts), supplier catalog pricing, or item’s last cost/standard cost |
| Gross/Net Weight | Optional - not visible in default grid view | Weight tracking for shipping and handling calculations |
| Expiration Date | Optional - not visible in default grid view | For perishable or time-sensitive inventory |
| Remark | Optional - not visible in default grid view | Free-text field for notes about this specific receipt line |
| Reference | Auto-generated or manual - not visible in default grid view | Tracking number for cross-referencing with external documents |
Purchase Order Receipts
When receiving against a purchase order, the system validates quantities, tracks partial receipts, and flags over-receipts.
Workflow:
- Navigate to Orders → Purchasing → Purchase Orders
- Open the purchase order to view its lines, then click “Receive”
- The receive screen opens pre-populated with the PO warehouse, supplier information, job assignment if present, line items with expected quantities (depending on admin options), and the PO Receive adjustment code.
- Assign locations for each line item:
- Manually select warehouse locations
- Or allow system to auto-assign from item defaults (done on save)
- Review and adjust quantities and other attributes as permitted by system configuration
- Save to review, then Receive to finalize
- Optionally print receiving documents (putaway lists, labels, etc.)
Features:
- Quantities may be editable or locked based on admin options
- Partial receipts automatically update PO line status
- Over-receipts generate warnings but can proceed if approved/allowed by system settings
- Unit costs default from PO line items
- Optionally auto-create backorders for remaining quantities (Admin Option 280)
- Line items close automatically when fully received
- Putaway lists help warehouse staff locate received items on shelves
See the detailed Purchase Orders guide for creating and managing purchase order records.
Appointment Receipts
Appointments track expected inventory from suppliers without formal purchase orders-ideal for consignment stock, recurring deliveries, or informal arrangements.
Workflow:
- Navigate to Inventory → Management → Appointments
- Select the appointment and click “Receive”
- The receive screen opens pre-populated with the appointment warehouse, supplier information, job assignment if present, line items with expected quantities (depending on admin options), and the Appointment Receive adjustment code.
- Assign locations for each line item:
- Manually select warehouse locations
- Or allow system to auto-assign from item defaults (done on save)
- Review and adjust quantities and other attributes as permitted by system configuration
- Save to review, then Receive to finalize
- Optionally print receiving documents (putaway lists, labels, etc.)
See the detailed Appointments guide for creating and managing appointment records.
Cycle Counting
Cycle counts verify physical inventory against system records and automatically adjust stock levels for discrepancies. This is the preferred method for physical inventory corrections and systematic accuracy programs.
Workflow:
- Navigate to Inventory → Inventory → Cycle Counts
- Create a new count specifying warehouse, locations, and optional filters (supplier, category)
- The system generates count lines showing expected quantities
- Enter actual counted quantities and locations
- Review variances (shortages and overages)
- Submit for approval if required (Admin Option 170)
- Post to automatically receive overages, issue shortages, and move location discrepancies
Capabilities:
- Variance analysis with filtering (show only discrepancies, shortages, overages, etc.)
- Auto-save during counting to prevent data loss (Admin Option 526)
- Approval workflows for accountability
- Automatic adjustment posting eliminates manual receiving/issuing
- Variance reports for accuracy tracking
See Cycle Counting for complete documentation on creating counts, managing variances, and approval processes.
Order Returns
Return unused materials from work orders or shipping orders back to inventory using the dedicated return modules.
Work Order Returns: Use the Work Order module’s return functionality at Orders → Other → Work Orders → [Select WO] → Returns for proper cost reconciliation, labor tracking, and work order status updates.
Shipping Order Returns: Use the Shipping Order module at Orders → Shipping → Shipping Orders → [Select SO] → Returns for customer credit processing, return authorization tracking, and proper order status updates.
Returning via the Receive Screen
The Receive screen can also load SO and WO returns directly when enabled. If Admin Options 196 (SO returns) or 197 (WO returns) are active and your security permissions include Create/Modify SO or Create/Modify WO, the Return SO and Return WO buttons appear on the Receive screen.
Select the order from the dropdown and click the corresponding button to load its lines. Receiving through this path updates order status automatically - the shipping order is marked as canceled and the work order is set to returned status.
Mobile Receiving
Complete receiving operations on mobile devices for increased flexibility and warehouse efficiency.
Workflow:
- Login to Inventory Pro Mobile
- Select the appropriate warehouse
- Navigate to Orders → View Purchase Orders or Appointments
- Select the order/appointment to receive
- Check items being received and click “Complete Order”
- Click “Receive” to finalize the transaction
Features:
- Barcode scanning for faster item entry
- Real-time inventory updates
- Location assignment on the warehouse floor
- Serial number capture
Validation and Business Rules
The system enforces several rules during receiving to maintain data integrity:
Item Validation:
- Discontinued items cannot be received
- Items must be enabled in the receiving warehouse if warehouse assignments are enforced (Admin Option 504)
Serial Number Rules:
- Required for serialized items unless auto-assignment is configured
- Duplicate serial numbers blocked based on your uniqueness settings
- System can auto-generate serials based on seed patterns
Location Validation:
- Location must exist in the warehouse master
- Locations marked “On Hold” prevent receiving
Date Controls:
- Date In field limits forward/back-dating based on Admin Option 527
- Prevents accidental historical or future-dated transactions
Pricing:
- Unit cost defaults from appropriate source (PO, vendor, item master)
- Zero costs generate warnings but can proceed if approved
RFID Tracking:
- Duplicate RFID tags are rejected system-wide
Admin Options
Key configuration options affecting receive operations:
| Option | Description |
|---|---|
| 13 | Update item’s default cost when receiving against purchase orders |
| 17 | Update item’s default cost when receiving against appointments |
| 73 | Default receiving screen view (can be overridden by user if enabled) |
| 94 | When receiving against PO/Appointment, don’t pre-populate the receiving screen with line items |
| 105 | Assist in serial number assignment - enter first number and system populates sequence |
| 113 | Prevent automatic line splitting when receiving (keeps quantities together) |
| 200 | Allow “Load PO” functionality to populate grid from purchase orders |
| 271 | Enable alternate serial/lot number assignment and auto-generation |
| 280 | Auto-create backorders for remaining unshipped PO quantities |
| 504 | Enforce warehouse-specific item assignments (items must be enabled per warehouse) |
| 505 | AutoFill location and reference fields from previous line for faster entry |
| 527 | Date In override range (days) - restricts how far forward/back receipts can be dated (0=disabled, 1-28 days) |
| 532 | Load PO pricing when manually receiving items (applies PO costs to direct receives) |
| 800 | Allow receiving into locations marked “On Hold” |
| 804 | Allow receiving purchase orders into “On Hold” locations |
Additional Features
Print Labels
Enable the “Print Labels” checkbox to automatically generate location and serial number labels after receiving. Useful for barcode-based warehouse operations.
Putaway List
After receiving items, click “Putaway” to generate a warehouse report showing:
- Optimal storage locations based on settings and existing stock
- Current inventory levels at each location
- Suggested locations for received items
- Quantities and bin assignments
- Putaway instructions for warehouse staff
This helps warehouse staff efficiently locate where items should be shelved and optimizes warehouse organization.
Bulk Import
For large-scale operations or data migration, use the bulk import feature. The system loads data into the temporary receive grid for review before finalizing.
Access: Utilities → General → Import and Export - select Receive Stock under the Stock Transactions section
Supported File Formats: CSV, XLS, XLSX
Available Fields:
| Field | Required | Description |
|---|---|---|
| Warehouse | Yes | Destination warehouse name or ID |
| Item ID | Yes | Item number or item identifier |
| Units | Yes | Quantity to receive |
| Location | No | Warehouse bin location |
| Serial | No | Serial number for tracked items |
| Serial 2 | No | Secondary serial/lot number (Admin Option 271) |
| Net Weight / Gross Weight | No | Weight tracking |
| Unit Cost | No | Per-unit cost for inventory valuation |
| Reason Code | No | Positive adjustment code ID explaining the receipt |
| Reference | No | Your tracking number or external document reference |
| Remark | No | Line-level notes |
| Supplier | No | Supplier ID or name |
| Job | No | Job assignment ID or name |
| RFID Tag | No | RFID tracking number |
| SpareNum1/2, SpareString1/2 | No | Custom fields for special requirements |
Workflow:
- Prepare your data file with column headers matching the field names above
- Navigate to Utilities → General → Import and Export and select Receive Stock under Stock Transactions
- Upload your file (CSV, XLS, or XLSX)
- System validates and loads data into the receive grid
- Review all imported lines for accuracy
- Make corrections if needed
- Click “Receive” to finalize
Use Cases:
- Opening balance imports when implementing the system
- Large shipment processing from external systems with electronic manifests
- Data migration from legacy systems
Important: For ongoing physical inventory corrections with hundreds of line items, use Cycle Counting instead. Cycle counts provide better variance analysis, approval workflows, and historical tracking specifically designed for inventory accuracy programs.
Reason Codes
The Reason field on the receive screen identifies why inventory is increasing. Every receipt requires an adjustment code for audit trail and reporting purposes.
Standard Codes:
- Direct Receive: Default for manual receipts
- PO Receive: Purchase order receiving (auto-assigned when receiving from a PO)
- Appointment Receive: Receiving against appointments (auto-assigned)
- Physical Inventory: Corrections from physical inventory counts
- Supplier Shipment: Standard supplier deliveries without a formal PO
- Assembled, WO Assembled, WO Return: Work order-related receipts
- Audit Overages, Credit Return, Canceled Shipment, PO Correction: Specialized adjustment scenarios
Additional codes may be configured by your administrator.
Managing Codes: Create custom codes via the icon next to the Reason field, or at System → Definitions → Positive Adj. Codes. Use descriptive names and avoid generic codes like “Miscellaneous” for better reporting.
For complete information on adjustment codes, their purpose, best practices, and reporting capabilities, see Adjustment Codes.
Best Practices
Quality Control:
- Physically inspect items for damage and verify specifications before accepting
- Validate serial numbers match delivery documentation
- Record expiration dates for perishable or time-sensitive inventory
- Document and resolve receiving discrepancies immediately
Operational Guidelines:
- Process receipts promptly upon delivery to maintain accuracy
- Verify quantities and costs against purchase orders
- Assign specific storage locations during receiving, not later
- Use appropriate reason codes for accurate reporting
Planning and Preparation:
- Coordinate delivery schedules with suppliers
- Ensure receiving areas and locations are ready
- Maintain delivery receipts and supporting documentation
- Train receiving personnel on system procedures
Troubleshooting
“Item not allowed in warehouse”
- Problem: Item not enabled for receiving warehouse
- Solution: Enable item in warehouse assignments or disable Admin Option 504
- Prevention: Maintain accurate warehouse/item relationships
“Location does not exist”
- Problem: Bin location not defined in warehouse
- Solution: Add location via Inventory → Warehouse → Warehouse Locations or use existing location
- Prevention: Set per-warehouse location defaults instead of global defaults
“Serial number already exists”
- Problem: Duplicate serial number detected
- Solution: Verify serial number accuracy and check if already used
- Prevention: Implement serial number validation at receipt and verify uniqueness settings
“Discontinued item”
- Problem: Cannot receive discontinued items
- Solution: Reactivate item in master data or verify correct Item ID selected
- Prevention: Maintain current item master with accurate status
Screen shows old data
- Problem: Previous transaction still displayed
- Solution: Click “Reset” to clear and start fresh
- Prevention: Always reset after completing transactions
Key Reports
Access receiving reports via Reports → [Search] or direct access from the receiving screen.
Receipt History (Report 99): Complete transaction log showing all receiving transactions with filtering by warehouse, supplier, date range, and transaction type. Displays receipt number, date, warehouse, supplier, reference (PO, appointment, or adjustment), item ID, quantity, location, serial/lot numbers, unit cost, and total value. Primary report for tracking all inventory receipts and investigating discrepancies.
Audit Trail (Report 125): Detailed audit log with user timestamps, reference tracking, and full transaction history. Shows who received what items, when, and why with complete traceability for accountability and compliance. Essential for financial audits and internal controls.
Hot Items (Report 152) and Hot Items (Receiving) (Report 156): Identify frequently received items for warehouse optimization and demand forecasting. Use to optimize warehouse layout by placing high-frequency items in accessible locations.
All reports support filtering by date range, warehouse, item, supplier, job, reason code, and user. Export to Excel for further analysis.
Related Topics
- Appointments - Managing expected receipts without purchase orders
- Purchase Orders - Creating and managing formal purchase orders
- Cycle Counting - Physical inventory verification and corrections
- Mobile Receiving - Mobile receiving with barcode scanning
- Receiving Reports - Receipt history, stow lists, and intake reports
- Import & Export - Bulk data loading procedures
- Returns - Purchase order and shipping order returns
- Item Alias - Alternative item IDs for cross-referencing
On this page